Stairs

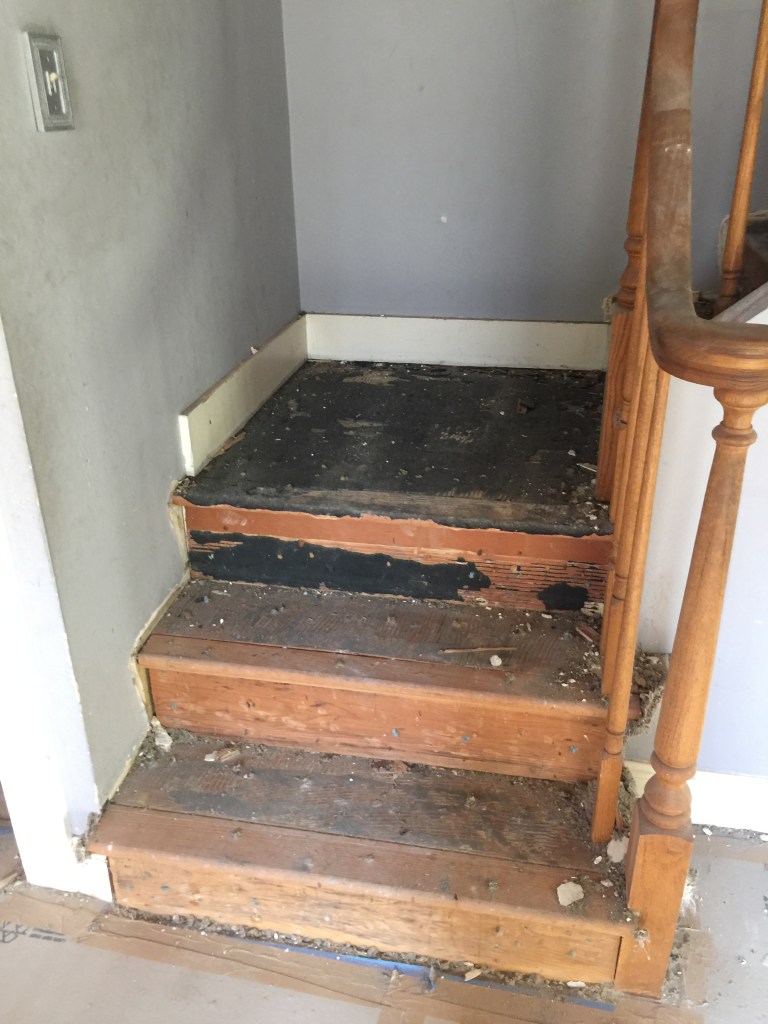
Our main floor to second floor stairs were carpeted. During demo they tore out all the carpet and I found some wood stair treads under the carpet. We were really hoping we could update the stairs to be wood with a runner instead of fully carpeted, but apparently this is a “whole thing”. There are a lot of code restrictions around stairs (including step height, width, depth, hand rails, landings, and variation between steps etc). According to my measurements our existing stairs are already pushing the height limit so if we start trying to rebuild them theoretically we could fail inspection so we are best off just working with what we have. Sometimes you can put a thin veneer or cover piece over the top of existing stair treads to quickly update them, but between the existing height and the problem with matching the veneers with the existing floors, I don’t think this will be and easy fix.

The bottom few steps and landing were modified more recently and are made of plywood with just a bullnose piece of real wood added on for the edge.

I sanded down a few of the upper steps to see what we were working with after I pulled all the nails and staples and scraped off the adhesive and carpet padding. **Yes I did this myself, the workers probably think I am crazy, but I just had to know if we could use the existing wood stairs and my contractor kept saying it was too hard or would be too expensive. We are running out of money so I just got in there and got a little dirty!

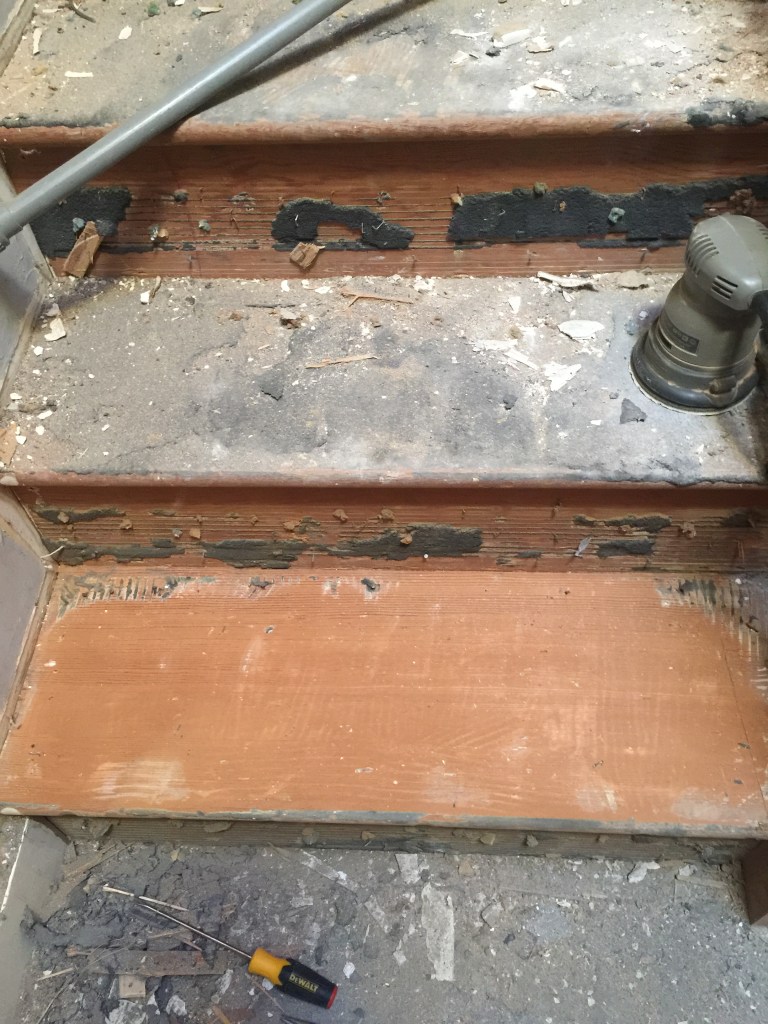
The remaining 11 steps are all solid wood… I thought it looked like red oak, but my contractor said it was pine. I will consult with a professional wood floor installed to get the final verdict.

Either way it looks like our choices are:

1) finish cleaning up all steps and replace landing and bottom two step treads with wood to match remaining steps, then stain (if wood is amenable and will match close enough to main flooring) or paint white, and install carpet runner (for safety and to cover up what will inevitably be imperfect stairs).

2) if option 1 won’t work, just re-carpet the whole thing like it was before and forget about it.

HVAC

We have been back and forth and up and down about the HVAC design for this house. Original plans just called for a single unit in the basement in the fancy new furnace nook we built. Contractor wanted us to install two units: on upstairs and one down. This is more efficient because less ducting (especially no vertical ducting all the way from the basement to second floor). This is more expensive, but would be great to have a really good working system.

UNFORTUNATELY… the contractor did not measure new attic space– there is no room for the unit in the attic so he wants to take over my linen closet. This is bad for 5 reasons: 1) I wanted a linen closet! 2) this costs more and our budget is already busted after overages on windows 3) the HVAC unit has to have ventilation so would have to have a weird vented door which would look ugly next to the other normal doors 4) the HVAC closet would be sharing the wall with my bedroom meaning I would have to hear the furnace rumble on and off all night and 5) I am irrationally uncomfortable with have a gas appliance right next to my bedrooms.

So back to the one unit plan.

Furnace Options: Now, there is the option to design a system with zones (i.e. electronic dampers in the duct system that allow for separate thermostats for upstairs and downstairs). I scoured the internet for info and advice on this and my conclusions is that a variable speed furnace (no bypass needed) with 2 zones is the best option. HVAC installer doesn’t seem to think bypass is a big deal, but all comments on the web consider it a recipe for disaster–I later found out that per the Herrs Inspection Guidelines bypass are NOT ALLOWED because they are incredibly inefficient.

AC unit: the actual AC unit has to sit outside and because our side yard is so narrow we need a special low decibel unit per Palo Alto city code.

Return Air: You need to have a approximately 20 x 20 vent in the house that pulls the air back into the system to avoid negative pressure build up. Since we moved the furnace location and had to install new foundation footings it is harder for the HVAC installer to use the old location (in the living room). Again, I scoured the internet for advice and got a lot of variable information. We had some discussion about putting it up high on the wall near the ceiling but, no matter how functional it might be, it seems terribly ugly. We compromised on a return in the floor of the family room.

I didn’t realize this was so complicated, and that HVAC design was so important for function–I would have liked to get a couple alternative estimates/advice from reputable HVAC companies. Really crossing my fingers that this will work come the first 95 degree day next summer!

UPDATE: We were almost ready to install the single unit when I started second guessing the HVAC contractor’s suggestions. Luckily I was able to talk to a couple people over the phone and one guy from another comapny even came over to give me a quick assessment. He determined that we really don’t have room for the large ducting required to install one unit with the proper air volume to actually cool the upstairs. The new HVAC contractor suggested a heat pump upstairs (for heating and cooling) which solves my closet problem. The heat pump is requires less room and less venting so we can place it in the attic. Most expensive solution but should be more straightforward to install and will be much more effective and efficient. We will just use a smaller traditional gas furnace in the furnace nook for the ground floor heating needs.

Framing

The walls are going up! This whole process took about a month.

First they put the new main level floor joists in.

Then they installed insulation.

Plywood over the insulation for the subfloor. We had all kind of leveling issues between the many remodels on this house so had to use taller floor joists for the second floor and double layer of plywood on the ground floor to make sure we didn’t have to add any little steps between the existing house and the addition.

Then they started the main floor walls.

Window framing and second level floor joists.

Framed around the foundation walls in the basement and frame the closet around the structural support posts.

Second level subfloor and walls.

Installed second floor ceiling and sub roof.

They added more walls to separate new master closet/bath with new bedroom and frame out the master bath shower and closet.

They cut out the roof to accommodate the new bedroom dormer egress window.

Concrete time

We had our first actual city inspection to check that the rebar and foundation prep work was up to par. I guess it all went well, all I heard was that we passed and are cleared to pour the concrete into all the holes and wood frames around the house. Sometimes it takes several weeks to cure, but, apparently, since we are just adding footings and not setting up a whole new foundation we don’t have to let it cure as long before framing.

New concrete foundation and fancy bolts

I was temped to write my initials in the concrete somewhere, but all the workers were there and I didn’t want to mess anything up.

About 24 hours later they took up some of the wood scaffolding and I guess that means the concrete is pretty dry.

Basement Window-well

One of the footings in the basement has a beam sticking out of it that is not centered. This strikes me as weird… but the contractor assured me that it is fine…

Rain!?!?

It wasn’t in the forecast… and then it was. The back of our house is still wide open to the elements. Most of the exposed part is just framing that isn’t a big deal, but there is drywall and nice oak flooring just under the remaining roof that I am worried about. We aren’t remodeling the entire house, half of the house has to stay intact–without mold. I am worried about it, but not much I can do. We still have 6 weeks of framing and since it is mid September we will likely have more rain before it is complete. Crossing my fingers that we can at least get to a place with a rough roof and tarping before any real rain comes!

Strike!

So we stumbled on another interesting hold-up. Apparently, the new structural design needs some kind of special, custom steel bracket thing from Simpson Strongtie to hold the beams and posts together. They do custom orders… but they went on strike a few days ago and now custom order are delayed by weeks. The contractor suggested using a local steel fabricator to make it to the same specs. Going rogue from a trusted manufacturer makes me a little nervous, but I talked to the structural engineer and he said as long as specs were the same he would sign off on it, so I guess it is all good. At first I didn’t believe the contractor and thought he was trying to pull something one me, but I did confirm that they are on strike, so I guess this is just another one of those thing that happens to slightly derail projects.

Green Building

We had a Green Building inspection. I wish that I could have been there, but I wasn’t. Apparently he explained some of the requirements that were on my “GB” plan sheet (i.e. water fixture flow rates, low/no VOC materials etc). I signed this GB sheet prior to submitting for building permit application, but didn’t really understand the requirements at the time. These requirements vary for each project. We were classified as “Tier 1”, apparently because we are adding/remodeling >1000 sq ft (I don’t know how they did their math, our plans show a much smaller area). One part of this means that we have to prove that *10% of our building materials come from recycled materials.

I am conflicted on my discussion for this post. I want to love that the city is encouraging green building practices… but I am also frustrated because it is hard to figure out how to meet the requirement. The actual code details that they reference on our Green Building sheet are listed here. Interestingly they are listed as voluntary by the state of California, but I guess Palo Alto has opted to make them required.

This is an great concept and I love making green choices… the thing is… I don’t know where to find these materials! The city gives a nice spreadsheet (RCV Table 1 at the bottom of this page) for documenting and calculating your materials to make sure you reach this 10% threshold, but they don’t have ANY resources for what types of materials or what vendors you might source these materials from! I spent a few hours online and found a few options:

I think carpet, flooring underlayment and insulation are a no brainer. I am interested in the countertops and will likely give it a try, but honestly a little skeptical about durability. Tile is an option, but many of the choices are A LOT (10-50X) more expensive than what I was planning on and there are not many choices. We already have half the roof covered in composite shingles so don’t really want to redo it all and we were hoping to match the oak wood floors in the rest of the house. We may have to find a couple other options to get to that 10%.

The thing I find interesting is… hardwood flooring is technically renewable and lasts 100 years! Recycled manufactured flooring is great, but only lasts 15-20 years. I sort of feel like choosing a material with really long lasting durability is worth something from an environmental standpoint too. It is also interesting that they don’t give you credit for reused products. There are reuse centers around the Pennisula where you can purchase donated home improvement products and building materials. Quality can be low and sure, many options might not be desirable or on trend, but I do find it funny that the Green Building policy doesn’t acknowledge that it is actually much better for the environment to re-purpose a donated cabinet or light fixture in lieu of purchasing a new one made of 50% recycled particle board or plastic.

*Note: Important to keep in mind that they only count the cost of the portion of the material that is recycled (see details here). So if I spend $1000 on carpet made of 50% recycled material, I only get to count $500 for that towards my threshold. It get’s even more complicated as you have to account for pre-consumer (or post-manufacturing) and post-consumer recycled materials. You only get 50% of the credit for pre-consumer recycled material so you really have to read the spec sheets. So if the $1000 carpet I bought above was made of factory scraps from other carpets that never left the factory (i.e. pre-consumer recycled content), I might end up only getting to count $250 towards my quota.

Special Inspection

It’s still not clear to me exactly how many inspections we are required to have. This residential inspection manual outlines what is required for each inspection, not everything applies to us and I didn’t get a list specific to our project.

We are supposed to have a project coordinator at the city, and I was hoping we could become good friends and that she would be any go to for questions…unfortunately she seems to have ghosted me.  

The contractor seems to have some idea about what needs to happen so he scheduled the special inspection.  As far as I can tell from this part of the residential inspection guide, the special inspection can be anyone who meets so the criteria. It turns out our structural engineer can be our special inspector. He has to come by and check that some bolts are properly installed into the foundation. He did his inspection, then sent us another bill for $400.


Next up is the Green Building inspection and then the Foundation Inspection. We have to get this done by a city building inspectors before he can pour the concrete foundation.  

A view of the stars

They took off the roof this week.

This is the scariest part of the process for me because:

1) the whole house is exposed to the weather now

2) ) it looks like house could just cave in

The contractor told me he thought the house would only be open like this for about 2 weeks. It’s been 5 days and they haven’t started framing yet so I’m not sure I buy that. Luckily the 10 day forecast looks clear so I think we have time. September in Palo Alto isn’t usually rainy, but there’s is definitely a chance of rain which doesn’t exist from June-August.  

The wood for framing is supposed to come tomorrow, but we still have to get through a special inspection first. 

Surprises in the walls

I think it happens to everyone, for sure if you have an old house. The architect does their best to estimate where the existing beams, pipes, and floor joists are… but they can’t always tell and old plans don’t always have that info. When they opened up the walls in our house they beams were not where we expected and the last remodel and done something funky by stacking the beam on the top of the floor joists (or something like that) which meant that now the floor joists for the new upstairs room needed to be twice as tall in order to match. This type of change requires us to submit a plan change to the building department. This is what we had to do:

  1. The contractor, architect, and the structural engineer discuss the situation and make a plan to correct for the issues. (Luckily, in this case, they were super fast and there was a straightforward, not too expensive, alternative.)
  2. The structural engineer and architect produce a new plan sheet and calcs.
  3. Someone (usually contractor–but I went as well) takes the revised plan sheets AND new CALCS to the building dept (we forgot the the calcs the first time… which means two trips–ugh). Apparently sometimes you need a signed letter describing why you are making the change… depends on the building inspector you get.
  4. The building reviewer at the city opens a plan revision and reviewed our changes. We had to pay a fee of around $100. Luckily this was simple enough that they are able to give you an “a-OK” stamp right there over the counter. (You don’t have to want 2 weeks for a review.)
  5. Then you get back to work executing the new plans.

Wondering how many more of these we will have to do…